By default, WordPress doesn’t have feature that allows users to set date for post expiration. However, if you’re looking to add this feature to your WordPress site, look no further that Simple Post Expiration plugin. It’s free and can be downloaded from WordPress.org plugin repo.
Adding a post expiration date is quite useful if you have a limited-time deals or offers on your site. Once a deal or offer is already expired, it will add a prefix “Expired” to the title of the post. For example, if you’ve a post with title “Black Friday Deal: 80% off of Dr Dre Headphone”, once the deal expired, the post title will be changed to “Expired: Black Friday Deal: 80% off of Dr Dre Headphone”
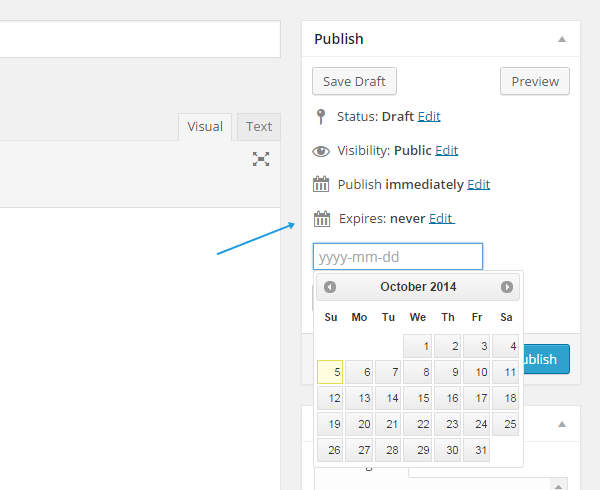
Once you’ve installed the plugin, you’ll see a new setting under Publish metabox in the post editor:

This is where you can see the expiration date for your posts. This plugin also comes with [expires] shortcode to display the expiration status of the post. It currently accepts 5 parameters. For more on this, please see its official page on WordPress.org. Furthermore, if you want to change the prefix, go to Settings > Reading and look for Expired Item Prefix setting. The default is set to “Expired:”.

Furthermore, this plugin also comes with a custom widget. Simply go to the Widget page and look for Expired/Expiring Posts widget and drag to any widgetized location supported by your theme. From the widget settings panel, you’ll be able to choose to display expiring soon posts or expired posts and define number of posts to be displayed.
If you’re looking WooCommerce support of this post expiration feature, we however recommend Post Expiration Date plugin. Please note that this is a premium plugin with one-time payment of $6. To be honest, $6 is quite cheap for a premium plugin that comes with top-notch support.
We hope this tutorial helped you to add post expiration feature to your WordPress site. Don’t forget to subscribe to our RSS and follow our Twitter and Google+ accounts for more great tutorials.
Leave a Reply